How to Photograph Jewelry for Etsy (Step by Step)
A step-by-step guide for Etsy jewelry sellers: a cheap home setup, the light that makes metal and stones look right, the photos every listing needs, and how AI can add on-model shots without a model.
By Ankur Sharma, Founder, ShotKart · Published · Updated
Quick answer: Shoot next to a window in soft daylight, on a plain light background, with white card around the piece to control reflections. Center the piece with space around it so Etsy's thumbnail crops don't cut it off, and add a scale shot on a model so buyers know the real size.
On this page
Jewelry is one of the most popular categories on Etsy and one of the hardest to photograph. Pieces are tiny, metal acts like a mirror, and stones only sparkle at certain angles. If you've ever wondered how to photograph jewelry for Etsy so it looks as good as it does in your hand, this guide walks you through it, from a cheap home setup to a faster AI workflow.
For general phone tips, see our guide on how to take jewelry photos with your phone. This post focuses on what Etsy specifically needs.
What Etsy needs from your jewelry photos
Etsy shows your first photo as a thumbnail in search, on your shop page and in the app, and it crops that thumbnail into different shapes. For jewelry, that means:
- Center the piece and leave a generous border. A necklace that runs to the edge of the frame gets cut off.
- Keep the first photo simple. A small ring on a busy background disappears at thumbnail size.
- Use large photos. Etsy recommends listing photos at least 2000 pixels wide and tall. See our full Etsy listing photo size guide for the details.
- Show the real piece. Buyers expect photos to match what arrives. Accurate color and size protect your reviews.
A cheap home setup
You don't need a studio. You need:
- A table next to a window, with daylight coming from the side
- A sheet of white card or poster board as a background, curved up behind the piece so there's no visible edge
- Two or three more pieces of white card to surround the piece and fill shadows
- Baking paper taped over the window if the sun is strong
- A small stand or putty to hold earrings and pendants upright
- Your phone, with a cheap tripod if you have one
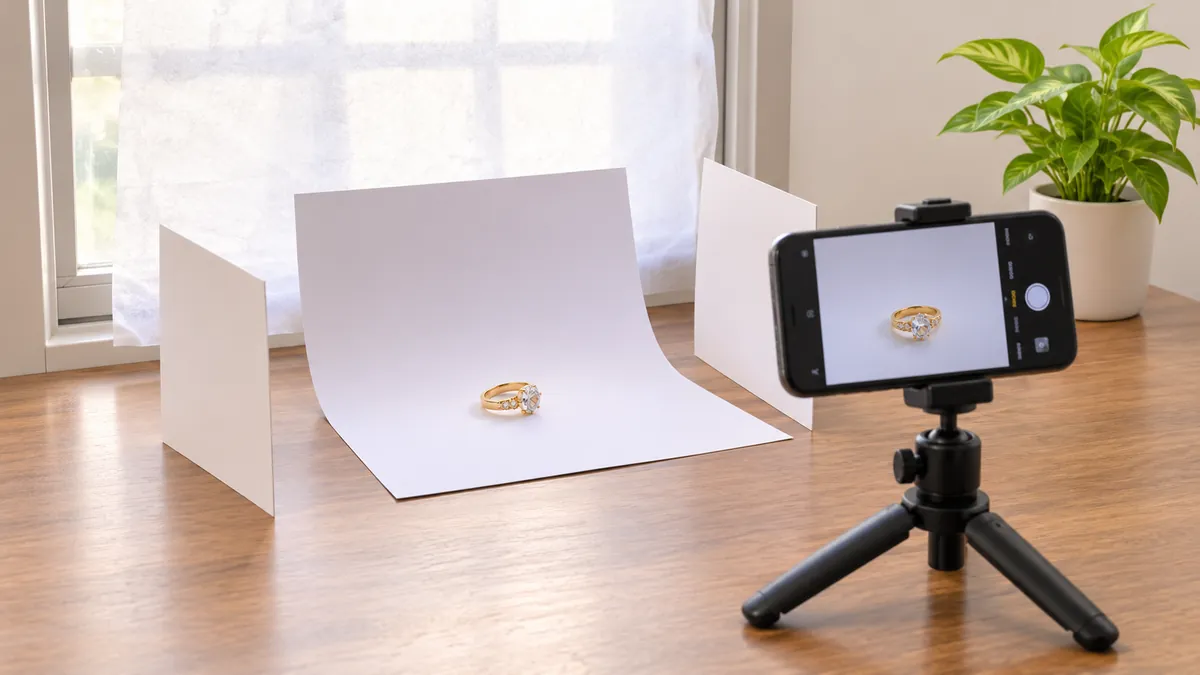
Turn off ceiling lights. Mixing daylight with warm bulbs makes gold look orange and silver look yellow.
Step-by-step: shooting a piece
- Clean the jewelry. Fingerprints and dust show up at close range. Use a soft cloth and handle pieces by the edges.
- Place it on the white card, centered, with lots of space around it.
- Surround it with white card so the metal reflects clean white rather than your room or your phone.
- Don't zoom too close. Phones struggle to focus very close up. Step back a little and crop later; Etsy recommends at least 2000 pixels, so start from your phone's full-resolution photo.
- Tap to focus on the most important detail, like the stone, and lower the exposure slightly so shiny parts don't turn pure white.
- Take many shots from slightly different angles. Sparkle changes with every small move.
- Edit lightly. Adjust brightness and white balance so the white background looks white and the metal looks true. Don't change the color of stones.
No model for on-ear or on-hand shots? Upload one photo of your piece and ShotKart creates on-model, studio and lifestyle jewelry photos in seconds.
Try it free, no signupThe 6 photos every Etsy jewelry listing needs
| Photo | Why it matters |
|---|---|
| Clean first photo on white | Wins the click in search |
| 45-degree angle | Shows depth and shape |
| Detail close-up | Shows stones, settings, texture and finish |
| Worn on a model | Answers "how big is it, really?" |
| Lifestyle or styled shot | Shows your brand and how to wear it |
| Packaging or gift shot | Helps gift buyers decide |
The scale shot matters most
The most common question jewelry buyers have is size. A ring photographed alone could be delicate or chunky; earrings could be studs or statement pieces. A photo of the piece being worn answers that instantly and cuts down on returns. Also list exact measurements in your description.
If you don't have a model, ask a friend, use your own hand or ear, or use AI to place your piece on a model.
Using AI for Etsy jewelry photos
Etsy jewelry sellers often need many photos per listing, and the on-model shots are the hardest to produce at home. ShotKart has a Jewelry category built for small, shiny pieces:
- Studio packshots on white for your first photo
- On-model shots: earrings on an ear, necklaces on the collarbone, rings on a hand
- Lifestyle scenes like marble, linen or dark velvet
Upload one clear phone photo, describe the piece ("gold hoop earrings with small pearls"), and choose the shots you want. See examples on our jewelry product photography, earrings on model and necklace on model pages.
Stay accurate
AI redraws the image around your piece, so very fine details like stone settings, engravings or thin chains can shift slightly. Always compare each image with the real piece before listing. For your first photo, a background replacement keeps your jewelry exactly as photographed and only changes the background. Keep real close-up photos of hallmarks, stones and clasps in every listing.
Etsy's image rules (updated in late 2026) require most listings to include at least one unedited photo of the actual item, which you may only crop, resize, watermark or convert. If you use AI to edit any listing photo, note it in your listing description. See how to remove background for Etsy product photos.
Common mistakes
- Shooting under ceiling lights, which makes metal look the wrong color
- Using flash, which creates harsh hot spots on metal and stones
- Cropping too tight, so Etsy's thumbnail cuts the piece off
- No scale shot, leaving buyers to guess the size
- A different background for every listing, which makes the shop look unplanned
- Over-editing stones until the color no longer matches the real piece
Make your shop look like a brand
Buyers who like one piece often browse your whole shop. When every first photo uses the same background, light and framing, your shop looks curated and trustworthy. Pick one look, such as white with soft shadows, and use it for every new listing.
Good jewelry photos come down to soft light, controlled reflections, careful framing and a scale shot. Get those right, add a few lifestyle and on-model images, and your listings will stand out in Etsy search. For more Etsy ideas, read our AI product photos for Etsy guide.
FAQ
What is the best background for Etsy jewelry photos?
A plain white or light neutral background works best for the first photo, because it stands out in search results. Marble, linen, wood or dark velvet work well for the extra lifestyle photos.
How do I stop reflections in jewelry photos?
Surround the piece with white card so the metal reflects plain white instead of your room, avoid flash, and change the camera angle slightly until reflections of your phone disappear.
Do I need a lightbox to photograph jewelry for Etsy?
No. Window light, white card and baking paper over the glass give soft light for very little money. A lightbox is useful if you can only shoot at night.
How do I show the size of jewelry on Etsy?
Add a photo of the piece being worn: earrings on an ear, a ring on a finger, a necklace on the collarbone. You can also photograph it next to a familiar object and list exact measurements in the description.
Can I use AI jewelry photos on Etsy?
Yes, as long as the photos accurately show the piece you're selling. Check every AI image against the real jewelry, and keep real close-ups of stones, settings and hallmarks.