Flat Lay Clothing Photography: How to Do It at Home
You don't need a professional studio to photograph clothes for your online store. With a smartphone, natural light and a few inexpensive tools, you can create clean, attractive flat lay clothing photos at home.
By Ankur Sharma, Founder, ShotKart · Published
Quick answer: Flat lay clothing photography means arranging a garment on a flat surface and photographing it from directly above. Use a clean background, natural window light, a wrinkle-free garment and a smartphone mounted straight overhead. It's an affordable way to create consistent clothing product photos for Shopify, Etsy and resale marketplaces.
On this page
- What Is Flat Lay Clothing Photography?
- Equipment You Need for Lay Flat Clothing Photography
- How to Do Flat Lay Clothing Photography at Home
- How to Style Different Clothes for Flat Lay Photos
- Should You Use Props in Flat Lay Clothing Photography?
- Editing Flat Lay Clothing Photos
- Common Flat Lay Photography Mistakes to Avoid
- Flat Lay vs Hanger vs Mannequin vs On-Model Photography
- The Limitation of Flat Lays: Customers Cannot See the Fit
- Final Thoughts
Selling clothes online means your product photos have to do a lot of work. Customers cannot touch the fabric, check the stitching or try on the garment before buying. Your pictures need to show the product clearly and help shoppers understand what they are getting.
Flat lay clothing photography is one of the easiest and most affordable ways to create professional-looking clothing photos at home. You arrange the garment on a flat surface, style it neatly and photograph it from directly above.
You don't need an expensive camera, professional studio or photography experience. A smartphone, natural light and a little preparation are enough to get started.
What Is Flat Lay Clothing Photography?
Flat lay clothing photography is a product photography technique where you arrange clothes on a flat surface and take a photograph from directly above.
Instead of showing someone wearing the garment, the image displays the clothing laid out neatly. You can photograph a single T-shirt, a pair of jeans, a dress or an entire outfit.
This technique is especially useful for:
- Shopify product listings.
- Etsy clothing stores.
- eBay and Depop resale listings.
- Instagram clothing businesses.
- Small fashion brands with limited photography budgets.
Flat lays work well when you want to show the overall design, color, pattern and details of a garment.
However, they are not the only way to photograph clothes. Hanger photos, mannequin photography and on-model photography can be better for showing garment shape and fit.
Equipment You Need for Lay Flat Clothing Photography
You can start with equipment you probably already have at home. There is no reason to purchase an expensive photography setup when you're just getting started.
Here is what you need:
| Equipment | Why you need it |
|---|---|
| Smartphone | To capture product photos |
| Window light | Provides soft, natural lighting |
| White sheet or plain background | Creates a clean photography surface |
| Step stool | Helps you photograph directly from above |
| Steamer or iron | Removes wrinkles |
| Lint roller | Removes dust, hair and lint |
| Tape or clips | Helps keep garments in position |
Choose a simple background. A plain white, beige, light gray or neutral-colored surface works well for most clothing products. Make sure the background does not distract from the garment.
Use natural light. A large window is often enough. Avoid direct sunlight that creates harsh shadows across the clothing.
If you don't have a phone stand, a step stool can help you position your smartphone above the garment. Just make sure your setup is stable and safe.
How to Do Flat Lay Clothing Photography at Home
The quality of flat lay clothing photos depends more on preparation and positioning than expensive equipment.
Follow these steps to create better images.
Step 1: Prepare the Garment
Start by making the clothing look presentable.
- Wash or clean the garment if necessary.
- Remove wrinkles using a steamer or iron.
- Use a lint roller to remove dust, hair and loose fibers.
- Check buttons, zippers and collars.
- Arrange sleeves and hems neatly.
Wrinkles and lint are particularly noticeable in close-up product photos. Spend a few minutes preparing the garment before taking pictures.
Step 2: Prepare Your Background
Place your background on a flat, clean surface.
A plain white sheet, poster board or neutral fabric can work. Make sure it is large enough to accommodate the entire garment without cropping the sleeves or bottom edges.
Smooth out any wrinkles in the background too.
Step 3: Find the Right Lighting
Place your setup near a large window.
Soft daylight makes clothing colors and textures easier to see. If one side of the garment looks too dark, use a white board or reflector on the opposite side to bounce light back.
Avoid mixing warm indoor lights with daylight. Different light sources can make white clothing look yellow or change the appearance of other colors.
Step 4: Arrange the Clothing
Place the garment in the center of the background.
Adjust the sleeves, collar, waist and bottom edges so the garment looks natural. Avoid making it too symmetrical if that changes its actual shape.
For a clean ecommerce image, make sure the complete garment is visible.
Step 5: Shoot Straight Down
Position your smartphone directly above the garment.
The camera should be parallel to the surface rather than tilted at an angle. An angled camera can make one side of the clothing appear larger than the other.
Use the grid feature on your smartphone camera to help keep the image straight. If possible, use a timer to avoid moving the phone when pressing the shutter.
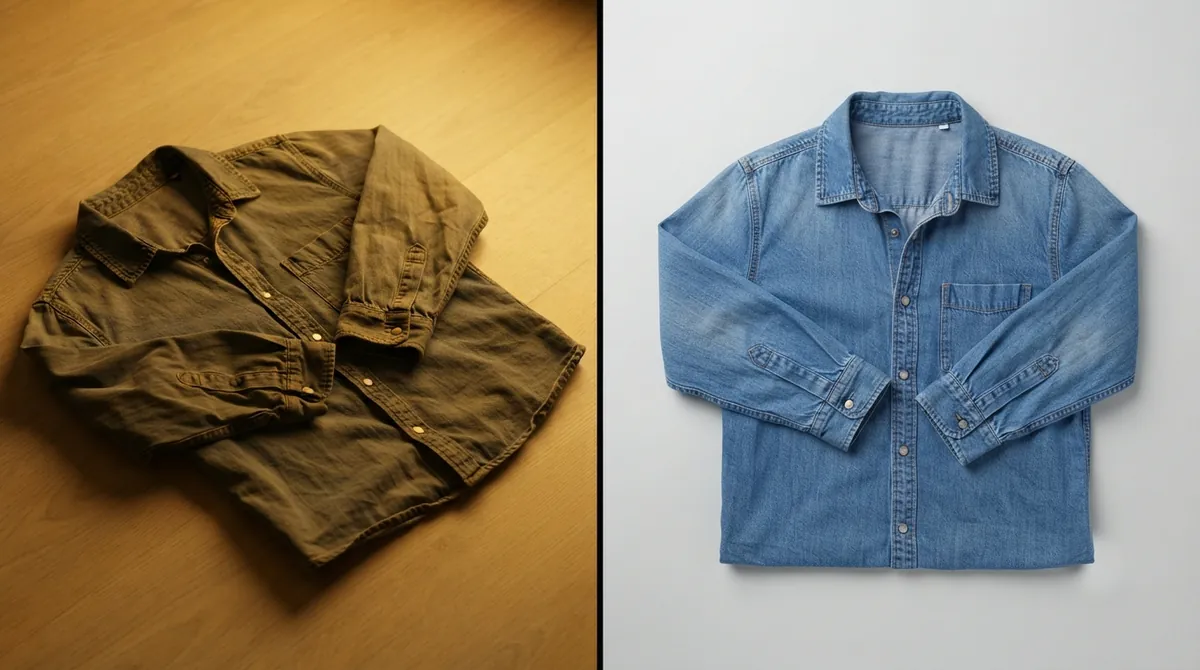
Step 6: Frame the Photograph
Leave a little space around the garment.
Don't crop sleeves, collars, hems or other important details. Keep the clothing centered and maintain consistent spacing across your product listings.
Take multiple photos from the same position so you can choose the clearest one later.
Want it on a model? Upload your flat lay and ShotKart turns it into on-model, studio and lifestyle images in seconds.
Try it free, no signupHow to Style Different Clothes for Flat Lay Photos
Different garments need slightly different arrangements. A T-shirt, dress and pair of jeans will not look their best in exactly the same position.
Here are some practical clothing flat lay photography tips.
T-Shirts
Lay the T-shirt flat and arrange both sleeves evenly. Straighten the neckline and bottom hem. Smooth the fabric gently without stretching it.
For basic product listings, a simple front-facing photograph is usually enough.
Shirts
Button the shirt before arranging it. Straighten the collar, align the buttons and position the sleeves naturally.
You can slightly angle the sleeves to make the composition look more balanced, as long as the shirt's shape remains accurate.
Jeans and Trousers
Place the jeans flat and straighten both legs. Keep the waistband visible and make sure pockets, buttons and stitching can be seen.
For denim products, a close-up image of the fabric or pocket details can help customers understand the material.
Dresses
Spread the dress carefully so the full silhouette is visible. Arrange the sleeves and skirt without hiding the design.
For longer dresses, make sure the entire length fits inside the frame.
Kids' Clothing
Small garments can be photographed individually or arranged as matching sets.
Keep the arrangement simple. Make sure each item is visible, especially when photographing a bundle or multipack.
Complete Outfits
You can arrange a shirt, trousers and matching accessories together to show an outfit idea.
Keep the main clothing pieces prominent. Avoid overcrowding the background with unnecessary objects.
Should You Use Props in Flat Lay Clothing Photography?
Props can make your product photos more visually interesting, but they should not distract customers from the actual clothing.
For example, you might use:
- A simple pair of sunglasses.
- A small neutral-colored bag.
- A minimal accessory.
- A simple decorative element.
Use props when creating lifestyle or social media content.
For your main ecommerce product image, keep the garment as the focus and avoid unnecessary decorations. Customers should immediately understand what you are selling.
Editing Flat Lay Clothing Photos
You don't need advanced photo editing software to improve your images. A few basic adjustments can make a noticeable difference.
- Crop: Remove unnecessary empty space while keeping the entire garment visible.
- Straighten: Correct tilted backgrounds and uneven framing.
- Brightness: Adjust exposure so the clothing is clearly visible without losing details.
- Contrast: Improve the separation between the garment and background without making the image look unnatural.
- Color accuracy: Make sure the clothing looks as close as possible to its actual color. Avoid filters that change fabric shades.
Always compare the edited image with the real garment. An attractive photo is not useful if it gives customers the wrong impression of the product.
When you export, keep every product photo the same size and shape. See our guides to Shopify product image size and Etsy listing photo size. For more shooting tips, read how to photograph clothes to sell.
Common Flat Lay Photography Mistakes to Avoid
Even a simple setup can produce poor results if you overlook a few details.
- Wrinkled clothing: Always steam or iron garments before photographing them.
- Tilted camera: Shoot directly overhead to avoid distorted proportions.
- Yellow lighting: Avoid mixing warm indoor lights with natural daylight.
- Busy backgrounds: Use neutral surfaces that keep attention on the clothing.
- Cropped edges: Keep the complete garment inside the frame.
- Incorrect colors: Avoid heavy filters that change the product's actual appearance.
- Inconsistent framing: Maintain similar positioning and spacing across your store listings.
Consistency matters. When customers browse your store, product photos should look like they belong to the same brand.
Flat Lay vs Hanger vs Mannequin vs On-Model Photography
Flat lay photography is affordable and easy to manage, but other photography styles have their own advantages.
| Photography style | Pros | Cons | Best for |
|---|---|---|---|
| Flat lay | Affordable, simple, easy to repeat | Doesn't show fit | Basic product listings and resale |
| Hanger | Shows garment length and natural hanging shape | Can look less polished | Everyday clothing listings |
| Mannequin | Shows garment structure and shape | Requires a mannequin | Structured clothing and formalwear |
| On-model | Shows fit, styling and how clothing looks when worn | Traditional shoots require a model | Fashion brands and lifestyle marketing |
You don't necessarily have to choose only one style. Many clothing stores use a combination of these photography methods. Selling secondhand? See our tips for resale clothing photos.
The Limitation of Flat Lays: Customers Cannot See the Fit
Flat lay clothing photography is useful for showing a garment's design, color and details. However, it has one important limitation: it doesn't show how the clothing looks when someone wears it.
Customers may want to understand:
- How does the shirt fit around the shoulders?
- How does the dress look when worn?
- Where does the trouser length fall?
- How does the garment look on a person?
This is where on-model photography can help.
Traditionally, creating on-model photos means arranging a photoshoot, finding models and preparing the clothing. That can be difficult for small sellers who don't have a large photography budget.
AI product photography offers another option. With ShotKart, you can upload one product photo and generate studio, lifestyle and on-model images. You can also turn a flat lay or hanger photo into an image featuring a female or male model.
To see how this works, explore our guides on turning flat lay photos into model photos and AI fashion model photography.
ShotKart also offers Background Swap, which keeps the product as photographed and changes only the background. This is useful when you want to improve the setting without changing the garment itself.
There is one important difference to understand: AI-generated on-model images redraw the garment. Prints, logos, patterns and other details can shift. Always compare generated images with the actual product before publishing them. Don't use an image that misrepresents what you're selling.
You can try ShotKart for free without creating an account. A free account includes three HD photos per day.
Final Thoughts
Flat lay clothing photography is a practical starting point for small online clothing businesses. You can create clean product images using a smartphone, natural light and a simple background without spending money on a professional studio.
Focus on preparing the garment, keeping the camera straight, choosing good lighting and maintaining consistent framing.
As your store grows, consider combining flat lay photos with hanger, mannequin or on-model images. Each style helps customers understand a different aspect of the clothing.
And if you want to experiment with on-model or different background images without arranging a traditional photoshoot, AI product photography tools can help you explore more options.
FAQ
What is flat lay clothing photography?
Flat lay clothing photography is a technique where clothes are arranged on a flat surface and photographed from directly above. It creates clean product images without needing a model or mannequin.
Is flat lay photography good for selling clothes online?
Yes. Flat lay photography is a useful and affordable way to show clothing clearly on Shopify, Etsy, eBay, Depop and Instagram. It works especially well for displaying garment details and creating consistent product listings.
How do I take flat lay clothing photos at home?
Use a clean, neutral background, place your garment neatly, remove wrinkles, use natural window light and take the picture directly overhead with your smartphone.
What is the best lighting for flat lay clothing photography?
Soft natural light from a window is a good starting point. Avoid harsh direct sunlight and mixed lighting because they can create unwanted shadows or change clothing colors.
What background is best for flat lay clothing photography?
A plain white, cream, gray or other neutral background works well. Choose a surface that contrasts with the garment so its shape and details remain visible.
Can I use my phone for flat lay clothing photography?
Yes. A modern iPhone or Android smartphone is enough for most small clothing stores. Clean the camera lens, use good natural light, keep the phone straight and avoid digital zoom.
Can I turn a flat lay clothing photo into an on-model image?
Yes. AI product photography tools such as ShotKart can transform a flat lay clothing photo into an image featuring a male or female model. Always check the generated garment against the original item for accuracy.